~ RESIDENT EVIL 2 ~
(Platinum Edition)
This speedrun guide has been tweaked based off MKim's Leon Scenario 2 Speed Guide hosted on GameFAQs. The main goal of this guide is to help the reasonably experienced RE2 gamer get BOTH the coveted Unlimited Ammo Gatling Gun and MAC11 Sub Machine Gun in one sitting plus a bonus "A" Ranking under 2 hours with NO SAVES! This has been tested and retested with the changes to make sure it's viable (with decent room for error. e.g. zombie grabs and bites, wrong turns, forgetting to pause). Hence, being an advanced player to use this guide is not a prerequisite. KNOWING THE GAME IS! Obviously this is NOT for first-timers, and will assume that you have done a long playthrough of Leon B Scenario 2 at least once to get a feel and an idea of where things are. In short, if you are struggling to find where the items are, and/or you can't make heads or tails what the guide is referencing, then this guide is NOT for you... yet!
I have also taken the liberty to rename some rooms in the maps, and I have chosen NOT to bypass some creatures in the game (I don't like things in my way!). Feel free to bypass any at your leisure, but always remember the main goal of this guide - to help you get the two special weapons (NOT the best speedrun time!). Trying to bypass some dogs (and fail) or getting swarmed by zombies just to save some ammo and then dying is not worth it, unless you don't mind trying and retrying.
Also, take note of the following conditions which MUST BE MET for this endeavour to succeed:
a. NO SAVING AT ALL, so
b. DON'T DIE! *lol*
c. NO USING HEALTH SPRAYS.
d. NO TOUCHING SPECIAL WEAPONS (weapons that take up 2 squares in your pack, except the gifted Rocket Launcher near the end).
e. NO USING WEAPONS WITH UNLIMITED AMMO (you will mainly be limited to the Hand Gun, Shotgun, and Magnum for the most part).
f. NO TOUCHING THE MAC11 (if you came across it, you are in the WRONG ROOM!!! What are you doing?!?!?!).
Basically, just follow the guide to the letter, and you'll be fine. Remember, the PAUSE KEY / F1 is your best friend as you will be making extensive use of it. Are you ready? Let's go.
G /  = Green Herb = Green Herb B / B /  = Blue HerbR / = Blue HerbR /  = Red Herb3xG = Triple Green MixRGB = Red Green Blue MixGB = Green Blue Mix = Red Herb3xG = Triple Green MixRGB = Red Green Blue MixGB = Green Blue Mix
1. Get Cabin Key. Bypass/disable 1 zombie in the way. Access Cabin door.
2. Zig-zag through zombies. Climb stairs to Helicopter Wreck outside.
Police Station 2nd Floor (Pt 1)
4. Go out to Emergency Stairwell. Take 1 G.
Police Station 1st Floor (Pt 1)
6. Open door. Take Hand Gun Bullets from corpse in hallway.
7. Enter East Office. Kill zombies. Take Shotgun Shells (Safe Combo: 2236) and 2 Gs. Combining another 3 Gs to make 3xG.
8. Take Valve Handle. Go back upstairs to Chopper Wreck outside.
Police Station 2nd Floor (Pt 2)
10. Back to Crow Corridor. Bypass Tyrant.
11. Go to Helicopter Wreck inside. Bypass 2 Lickers on the way. Enter Art Room.
12. Grab Shotgun Shells and Blue Card Key. Ignore Licker and exit.
13. Bypass the same 2 Lickers again to Waiting Room. Time to retire the Hand Gun permanently! In Waiting Room, take Small Key.
Equip *only*:
a. SHOTGUN SHELLS
b. SMALL KEY
c. BLUE CARD KEY
14. Go to Emergency Ladder. Release ladder and climb down.
Police Station 1st Floor (Pt 2)
16. Go Reception Room. Kill zombies with Shotgun. Open locked drawer. Take Shotgun Shells.
17. Onward to West Corridor. Take 1 G.
18. Go Conference Room. Kill both zombies outside.
19. Go Fireplace. Light up Painting. Take Red Jewel #1. Go upstairs to Statues Corner.
Police Station 2nd Floor (Pt 3)
21. Go to S.T.A.R.S. Office corridor. Kill zombies.
22. Go into S.T.A.R.S. Office. Take Magnum.
23. Go next door. Follow Sherry. Take Diamond Key and Shotgun Shells. Backtrack downstairs to Darkroom's office.
Police Station 1st Floor (Pt 3) DITCH MAGNUM and 2 RED JEWELS! :(
25. Take 2 Gs outside Darkroom's Office. Combine 3 Gs to make 3xG.
26. Go to Evidence Room. Take Shotgun Shells.
27. Go West Office. Kill zombies. Take 1 G and Heart Key.
28. Go to Lobby hallway. Kill zombies.
29. Go to East Office next.
30. Go Basement. Kill dog on the way and take 2 Gs. Combine 3 Gs to make 3xG.
Basement (Pt 1)
32. Go Elevator. Enter Cell #1. Take 1 G and 1 B. Combine them to make GB.
33. Onward to Cell #2. Hi Ben! :) Take Manhole Opener.
34. Go Kennel. Use Manhole Opener and climb down. Bypass Spiders.
Sewage Disposal (Pt 1)
Equip *only*:
a. SHOTGUN + SHELLS
b. DIAMOND KEY
c. One GB
36. Go in and out of Septic Pool. Hi again Ada! :D
37. As Ada: Avoid/Kill zombies. Solve puzzle, take the Club Key and get back.
38. As Leon: Take Club Key. Backtrack to Kennel.
Basement (Pt 2)
40. Go upstairs (if needed, there is 1 G in the Power Generator Room).
Police Station 1st Floor (Pt 4)
42. Go Interrogation Room. Take Rook Plug (if needed, there is 1 G in the Lobby corner).
43. Go Press Room. Light up 12, 13, 11. Ignore Tyrant. Take Cogwheel. Get out. If you have space, grab 1 R.
44. Go Main Hall. Bypass Tyrant on the way. Climb Emergency Ladder. Ignore Licker and go Waiting Room.
Police Station 2nd Floor (Pt 4)
Equip *only*:
a. MAGNUM + BULLETS
b. SHOTGUN + SHELLS
c. 2 RED JEWELS
d. COGWHEEL
e. ROOK PLUG
46. Go Art Room. Kill ALL Lickers along the way and inside with Shotgun. Take King Plug.
47. Go Chief's Room, then Private Collections Room. Take Crank. Leave.
48. Shoot down Tyrant with Shotgun (roughly about 5 shots or so). Loot Magnum Rounds.
49. Go Waiting Room.
Equip *only*:
a. MAGNUM + BULLETS
b. KING PLUG
c. ROOK PLUG
d. COGWHEEL
e. CRANK
f. One GB
50. Go Library. Bypass Licker again on the way. Take 1 R. Combine to make RGB.
51. Solve Library puzzle. Take Bishop Plug. Go upstairs to Cog Room.
Police Station 3rd Floor
53. Visit Ben in Cell #2 again.
Sewage Disposal (Pt 2)
55. SHOOT WILLIAM with MAGNUM (about 7-8 shots or so should do it)!
56. Go Sewer B1.
Sewer B1 (Pt 1)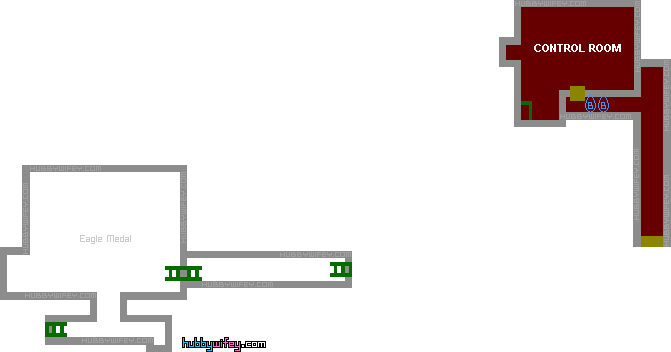
Equip *only*:
a. SHOTGUN + SHELLS
b. VALVE HANDLE
c. One G (if available)
58. Use Lift.
59. As Ada: Climb ladder. Cross bridge. Climb down another ladder.
Sewer B2 (Pt 1)
61. Cross bridge. Use Valve Handle again to raise bridge. Take 2 Gs and Shotgun Shells. Combine to make 3xG (if available).
62. Go Dumping Area. Hi again Ada! :)
Sewer B1 (Pt 2)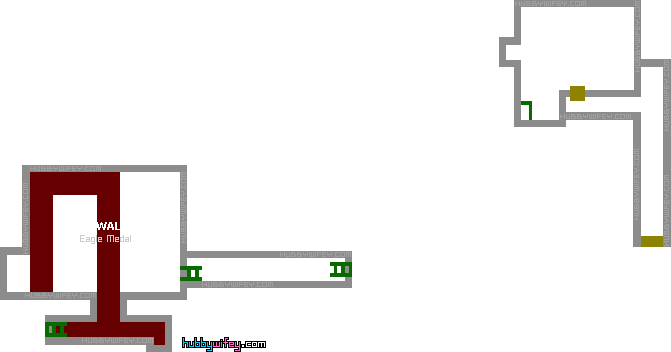
Sewer B2 (Pt 2)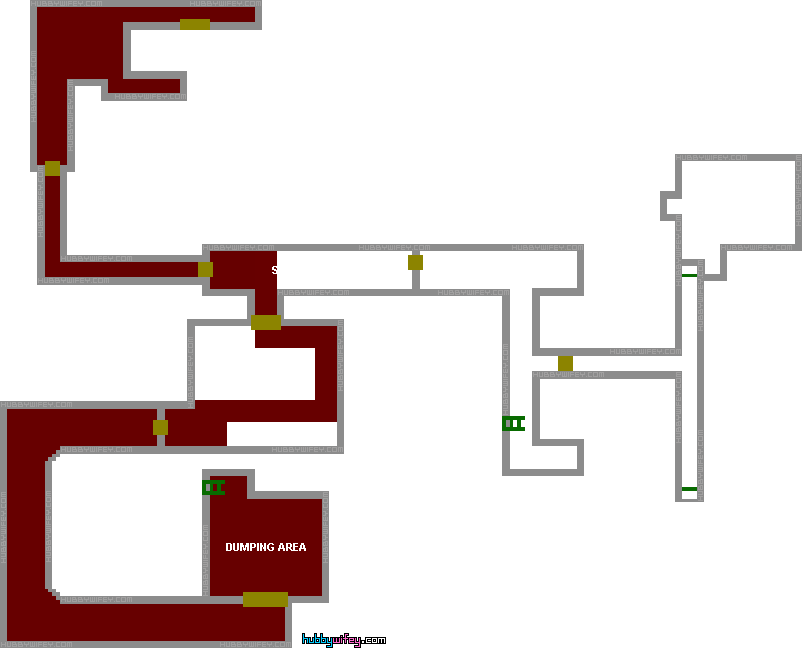
65. Cross bridge. Go Sewer Tunnel. Use Eagle Medal.
66. Follow corridor. Summon Tram. Shoot claws!
Vacant Factory B1
68. Go East Corridor. Take 1 G and 1 B. Combine to make GB (if available).
69. Go West Corridor. Climb ladder.
Vacant Factory 1F
Equip *only*:
a. MAGNUM + BULLETS
b. SHOTGUN + SHELLS
c. Two 3xG
71. Go out, use Lift. Head to Monitor Room. Take C. Panel Key.
72. Shoot Tyrant with the Shotgun (3-4 shots should do the trick)! Loot Shotgun Shells.
73. Backtrack to Control Room. Use C. Panel Key. Activate Tram and board.
74. Go toilet. Take Magnum Bullets.
75. SHOOT WILLIAM WITH MAGNUM! Once William gets away, DO NOT RELOAD YOUR MAGNUM YET!
Laboratory B1 (Pt 1)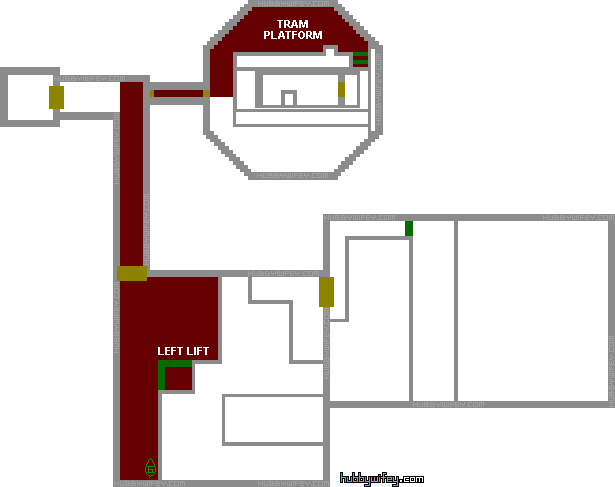
Equip *only*:
a. SHOTGUN + SHELLS
b. One 3xG
77. Push box to Left Lift. Use Left Lift to Pump Room Lower.
Laboratory B2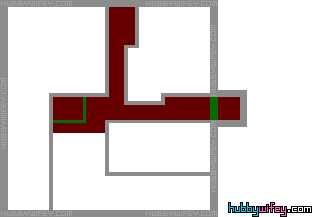
Laboratory B3
Laboratory B1 (Pt 2)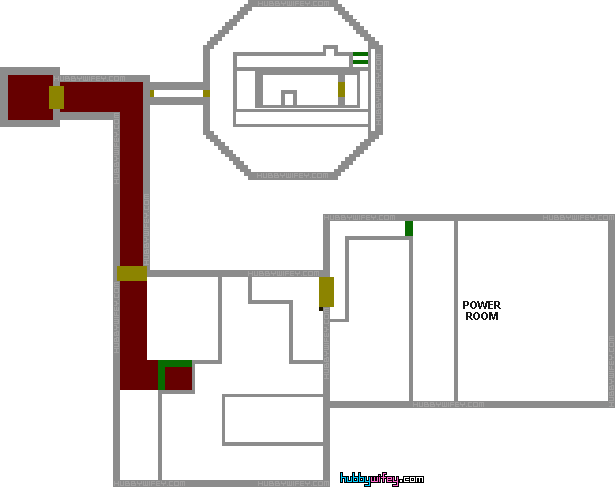
Laboratory B4 (Pt 1)
82. Go Cold Room. Take Fuse Case. Make Main Fuse.
83. Turn on Power Generator.
84. Go Red doorway (West Area). Kill Poisonous Plants with Shotgun.
85. Climb ladder down outside. Ignore Poisonous Plant.
Laboratory B5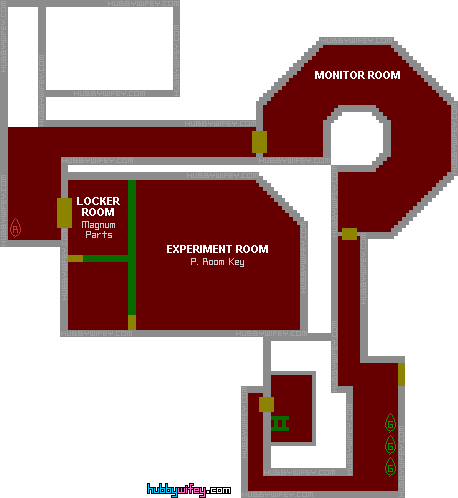
Equip *only*:
a. EMPTY MAGNUM + BULLETS
b. SHOTGUN + SHELLS
c. W. BOX KEY
d. One GB
87. Go Locker Room. Take 1 R outside. Combine to make RGB.
88. Inside Locker Room, use W. Box Key. Take Magnum Parts (upgrade *only* when empty. You get a free full reload)!
89. Go Experiment Room. Kill zombies (empty your Magnum here if needed. Then upgrade away). Take P. Room Key.
Laboratory B4 (Pt 2)
Laboratory B1 (Pt 3)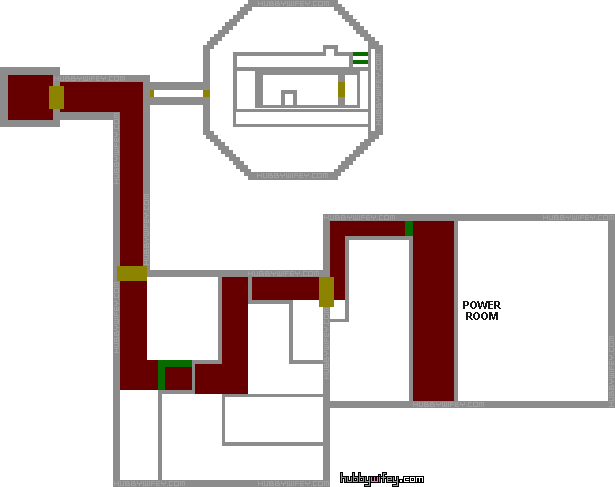
92. GRAB MASTER KEY OFF FLOOR NEAR ADA!!!
Laboratory B4 (Pt 3)
94. Backtrack to Elevator again. Use Master Key.
95. Go to end of Train. Take Platform Key.
Equip *only*:
a. MAGNUM + SHELLS
b. SHOTGUN (FULLY LOADED)
c. PLATFORM KEY
d. Three RGBs
96. Unlock Platform Gate. Go stairs.
97. Grab Joint S and Joint N Plugs. Use them further up next door.
98. SHOOT TYRANT WITH THE MAGNUM! FINISH HIM OFF WITH ROCKET LAUNCHER!
99. Open Tunnel Gate! Kill zombies in the way with Shotgun.
100. Start the Train. Go to back of Train.
101. SHOOT WILLIAM FOR THE LAST TIME WITH THE ROCKET LAUNCHER. FINISH HIM OFF WITH THE MAGNUM and/or SHOTGUN!
Congratulations!! & Your Reward... if you did it right that is... :)  
Sources:
1. "Leon Scenario 2 Speed Guide by MKim." GameFAQs, 1 January 2000, Web. 10 July 2021.
2. "Maps (Resident Evil 2)." Evil Resource, n.d., Web. 10 July 2021.
3. "Resident Evil 2 maps"." Resident Evil Wiki, n.d., Web. 10 July 2021.
4. "Unlockables in Resident Evil 2 (1998)." Resident Evil Wiki, n.d., Web. 10 July 2021.
|